
Goal
This tutorial aims to walk you through the steps necessary to configure Burp Suite to rotate your IP on every request using AWS API Gateway. While there are other ways to accomplish this task, AWS API Gateway is cheaper and more reliable than other IP rotation services.
Why would you want to rotate your IP? IP rotation can be useful in several scenarios, especially when the host implements IP-based rate-limiting.
For instance, when mounting a brute-force attack against a web application login form using Turbo Intruder (https://portswigger.net/research/turbo-intruder-embracing-the-billion-request-attack), IP rotation allows the attack to continue, even when there is IP-based rate-limiting or lockout.
Another example is when you are attempting to run the Burp Suite Active Scanner, and the target site begins limiting your requests based on your IP address.
By rotating your IP on every request, these issues disappear.
The IP rotation we will configure in this tutorial is based on the Fireprox tool by Black Hills (https://github.com/ustayready/fireprox). We have modified the tool (very) slightly to work better with Burp Suite, but most of the credit goes to the Black Hills team and the individuals they mention in the credit section of their repository (https://github.com/ustayready/fireprox#credit).
By the end of this tutorial, you will be able to make HTTP requests to your target URL in a browser or via Burp Suite, and your IP will rotate transparently in the background on every request.
Let’s dive in!
Prerequisites
To follow this tutorial, you will need the following:
- A Linux/macOS terminal
- An AWS (Amazon Web Services) Account
- Burp Suite (Community Edition is sufficient)
- Python3
- Git
Overview
The best way to explain the setup we are creating is with an architecture diagram.

To achieve our goal, we are going to follow this outline:
- Create a domain in AWS Route53 (pensivesecurity.io in this tutorial)
- Run the Fireprox tool to configure an API gateway
- Create a Certificate for Our Subdomain (httpbin.pensivesecurity.io in this tutorial)
- Create an API Gateway Custom Domain
- Create a DNS Record for Our Configuration
- Integrate with Burp Suite
- Test out our configuration to make sure our IP is rotating on every request (https://httpbin.org/ip)
Important Note 1: Throughout this guide, we will discuss Fireprox and Firefox. Fireprox is the unique tool we are using to automate configuring the AWS API Gateway. Firefox is a web browser.
Important Note 2: We recommend following this guide the first time through using https://httpbin.org as the target as we do. At the end of this tutorial, you will be able to prove to yourself that your IP is indeed rotating on every request. Then once you’re convinced it’s working, follow the steps again, substituting your real target URL in place of https://httpbin.org.
1. Create a Domain in AWS Route53
If you already have a domain registered in AWS Route53, you are welcome to skip this step. You can also transfer a domain over into AWS from another service by following this guide: https://docs.aws.amazon.com/Route53/latest/DeveloperGuide/domain-transfer-to-route-53.html.
For everyone else, follow this guide to register whatever domain name you like: https://docs.aws.amazon.com/Route53/latest/DeveloperGuide/domain-register.html
For this guide, we will be using pensivesecurity.io as our domain primary domain.
2. Run the Fireprox Tool to Configure an API Gateway
Now we are ready to run the Fireprox tool and create the IP rotating configuration in API Gateway. Fireprox entirely automates this process.
- Open your Linux/macOS Terminal
- Clone the slightly modified Fireprox repo
1
git clone https://github.com/lukewegryn/fireprox.git; cd fireprox;
- Run the following command, replace YOUR_ACCESS_KEY, YOUR_SECRET_ACCESS_KEY, and TARGET_URL with the proper values. TARGET_URL is the web application you are going to mount your attack against ultimately. In this tutorial, we will consider https://httpbin.org to be our TARGET_URL, but we are not going to mount any attacks against it, we’re just going to check our IP.
1
python3 fire.py --access_key "YOUR_ACCESS_KEY" --secret_access_key "YOUR_SECRET_ACCESS_KEY" --region "us-east-1" --command create --url TARGET_URL
- Make a note of the URL that the Fireprox tool outputs, this will be crucial later on.

3. Create a Certificate for Our Subdomain
We now need to create an HTTPS certificate for the subdomain we plan to use as our proxy. For this tutorial, we are going to choose the subdomain
1 | httpbin.pensivesecurity.io |
because our target is httpbin.org and our domain name is pensivesecurity.io. You will need to choose your subdomain with the form
httpbin.yourdomain.com
- In the AWS Console, click “Services” and then search for “Certificate Manager”.
- Click “Request a certificate”
- Make sure the “Request a public certificate” radio button is selected and then click “Request a certificate”
- Under “Domain Name” enter the subdomain that you chose. We will enter
httpbin.pensivesecurity.io. Click “Next”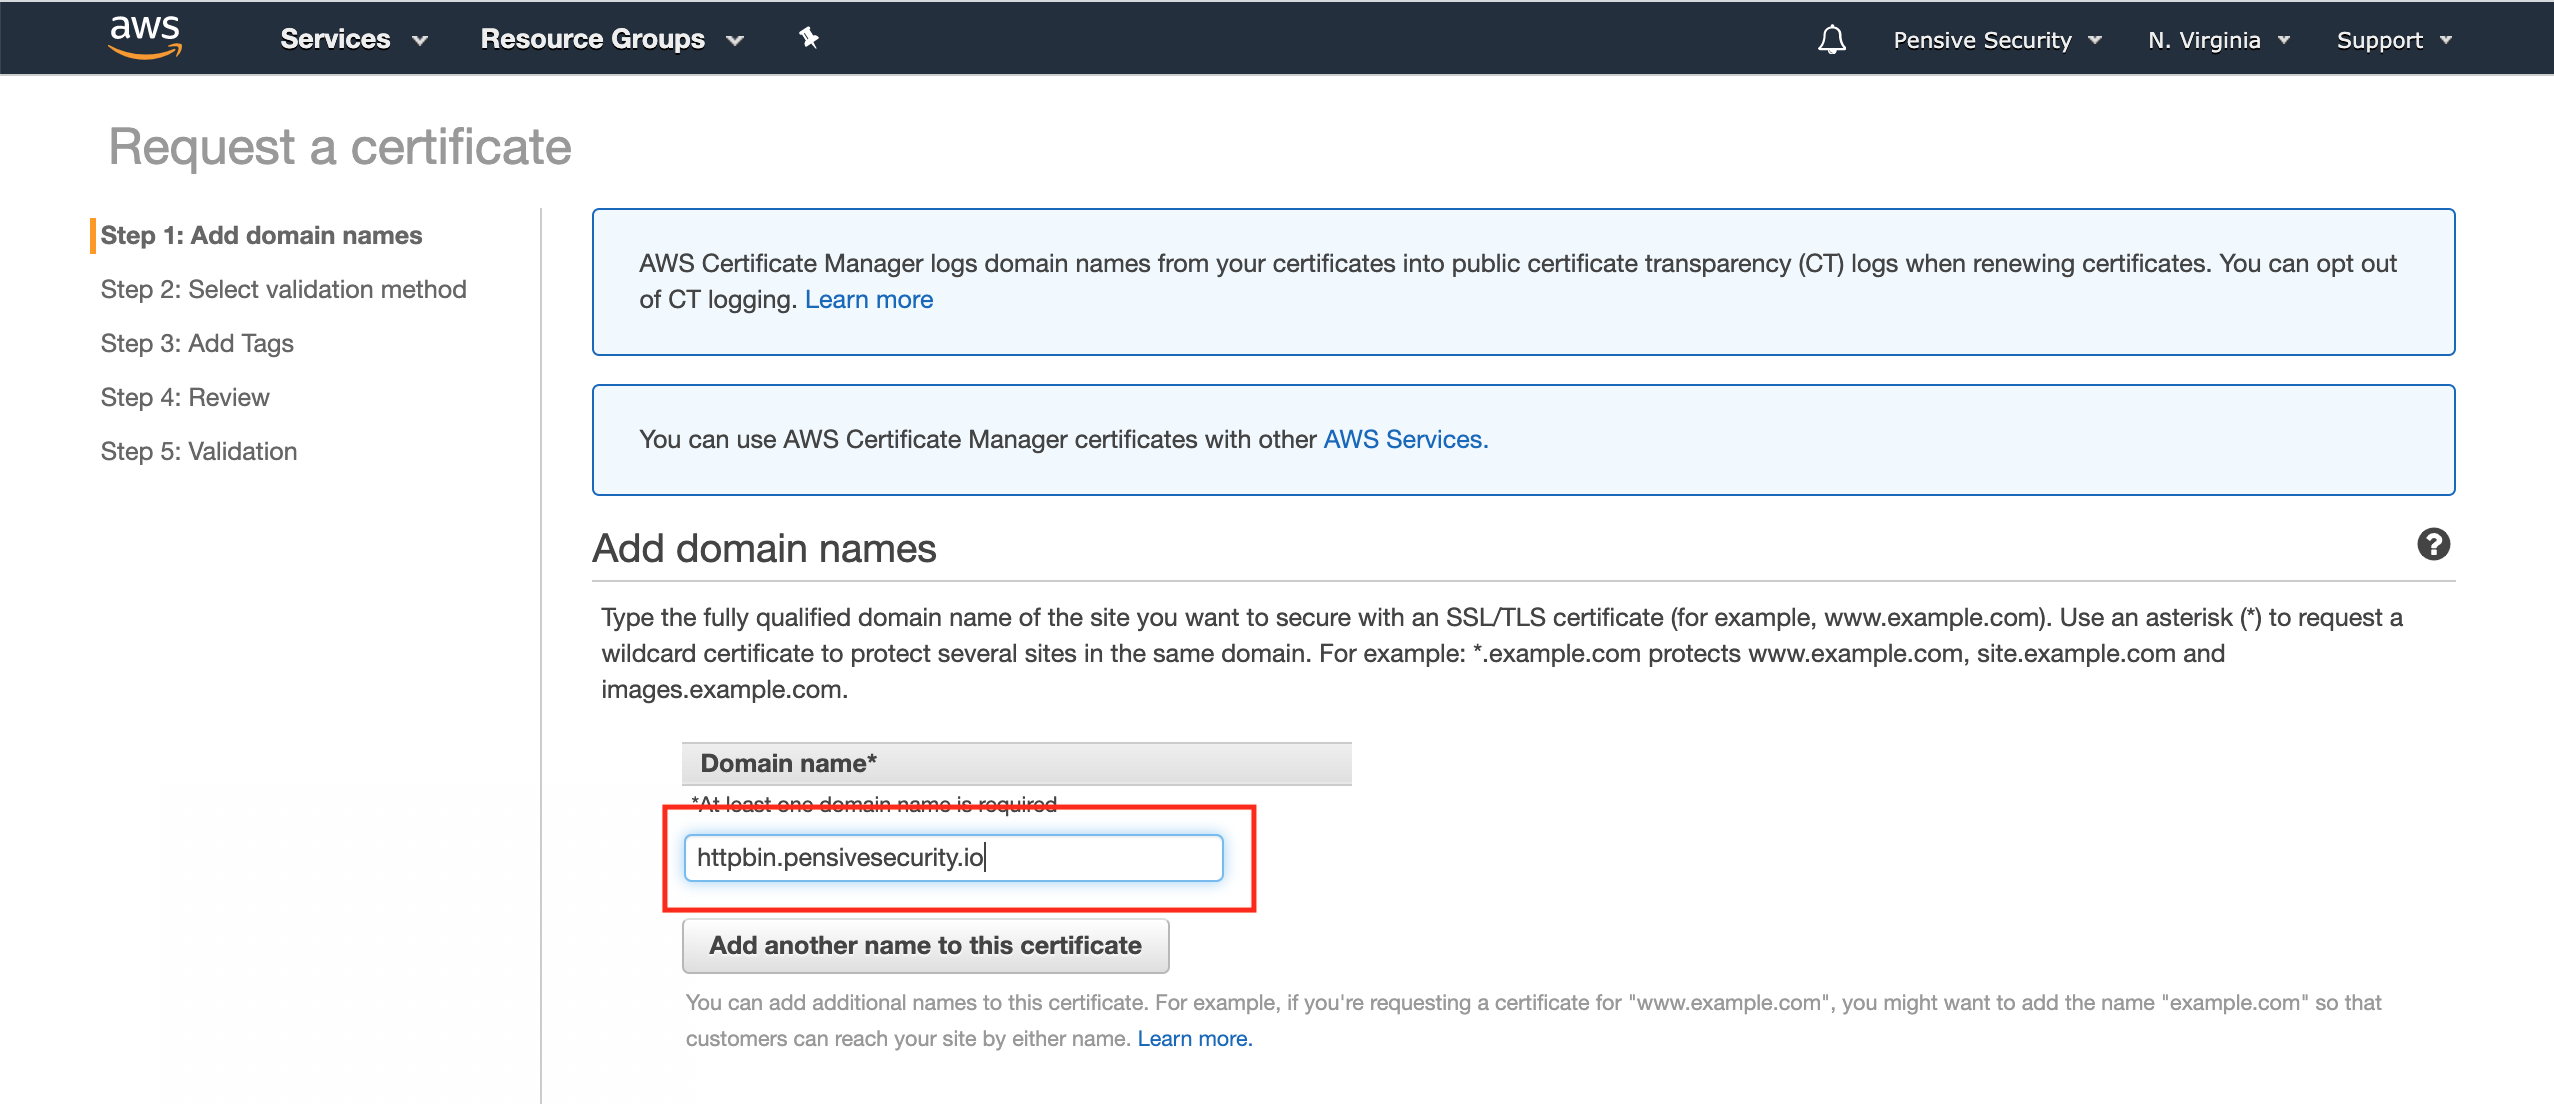
- Select “DNS Validation”. Click “Next”
- Click “Review”
- Click “Confirm and Request”
- Under Validation > Domain, click the expansion triangle next to your subdomain
- Click “Create record in Route 53”. Click “Create” in the popup window
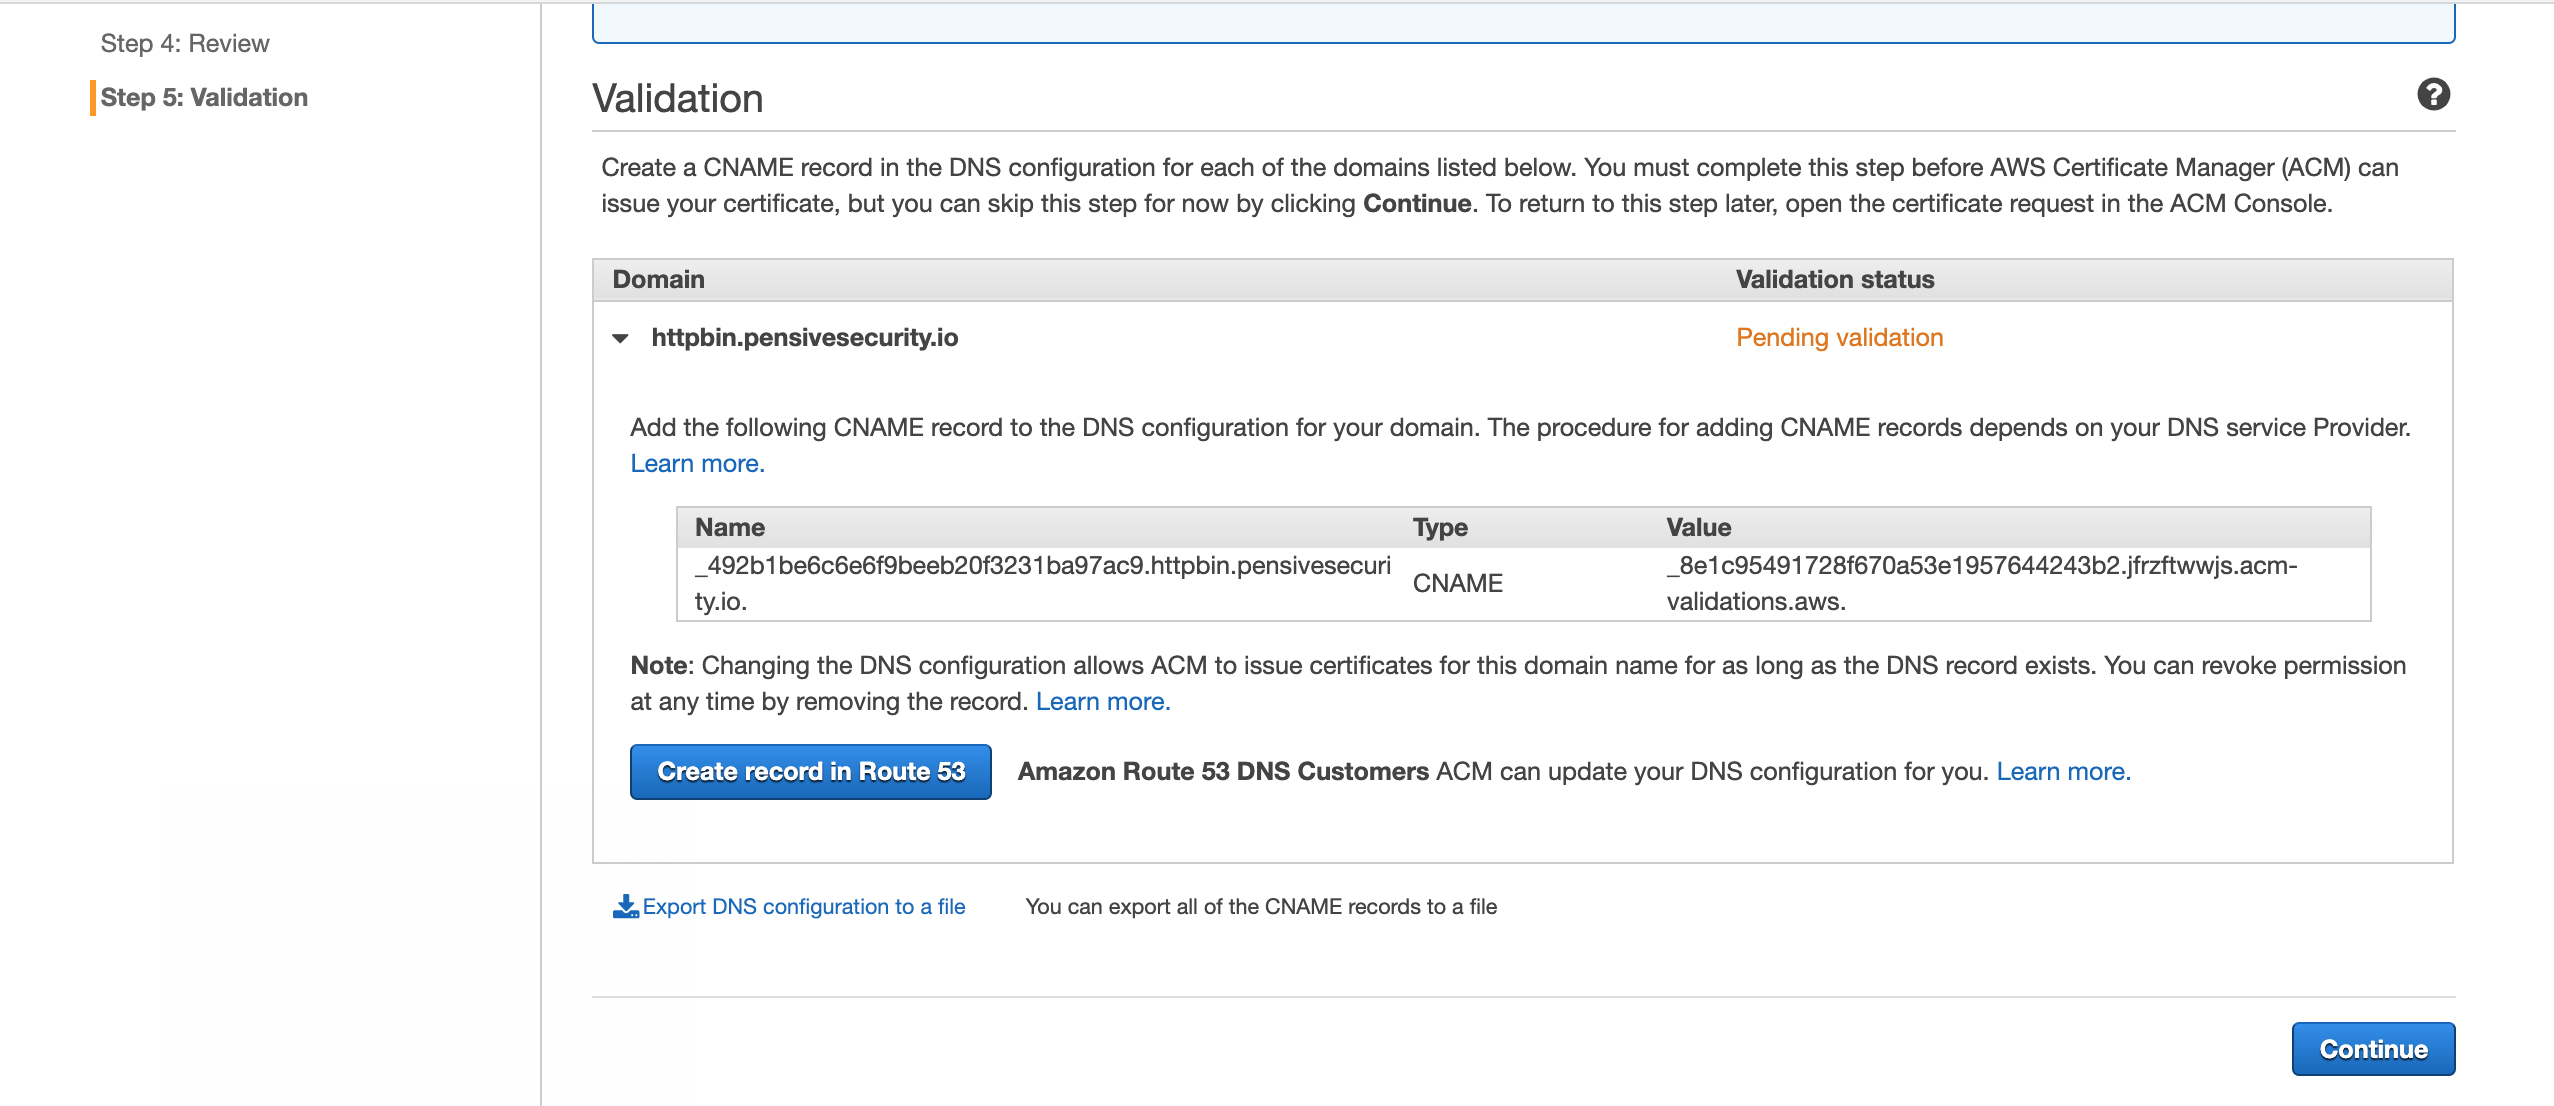
- Click “Continue”
- Wait about 5-10 minutes for the verification to complete.
- Once the Status is showing “Issued” you are ready to move onto the next steps
4. Create an API Gateway Custom Domain
Now we will add a custom domain in our API gateway, which matches the subdomain we specified above (httpbin.pensivesecurity.io in our case).
- In the AWS Console, click “Services” and then search for “API Gateway”
- In the menu on the left, click “Custom domain names”
- Click “Create”
- Enter the subdomain you created above in the “Domain name” field. We will use
httpbin.pensivesecurity.ioto make our target clear. - In the “ACM certificate” section, select the certificate matching your subdomain from the list.
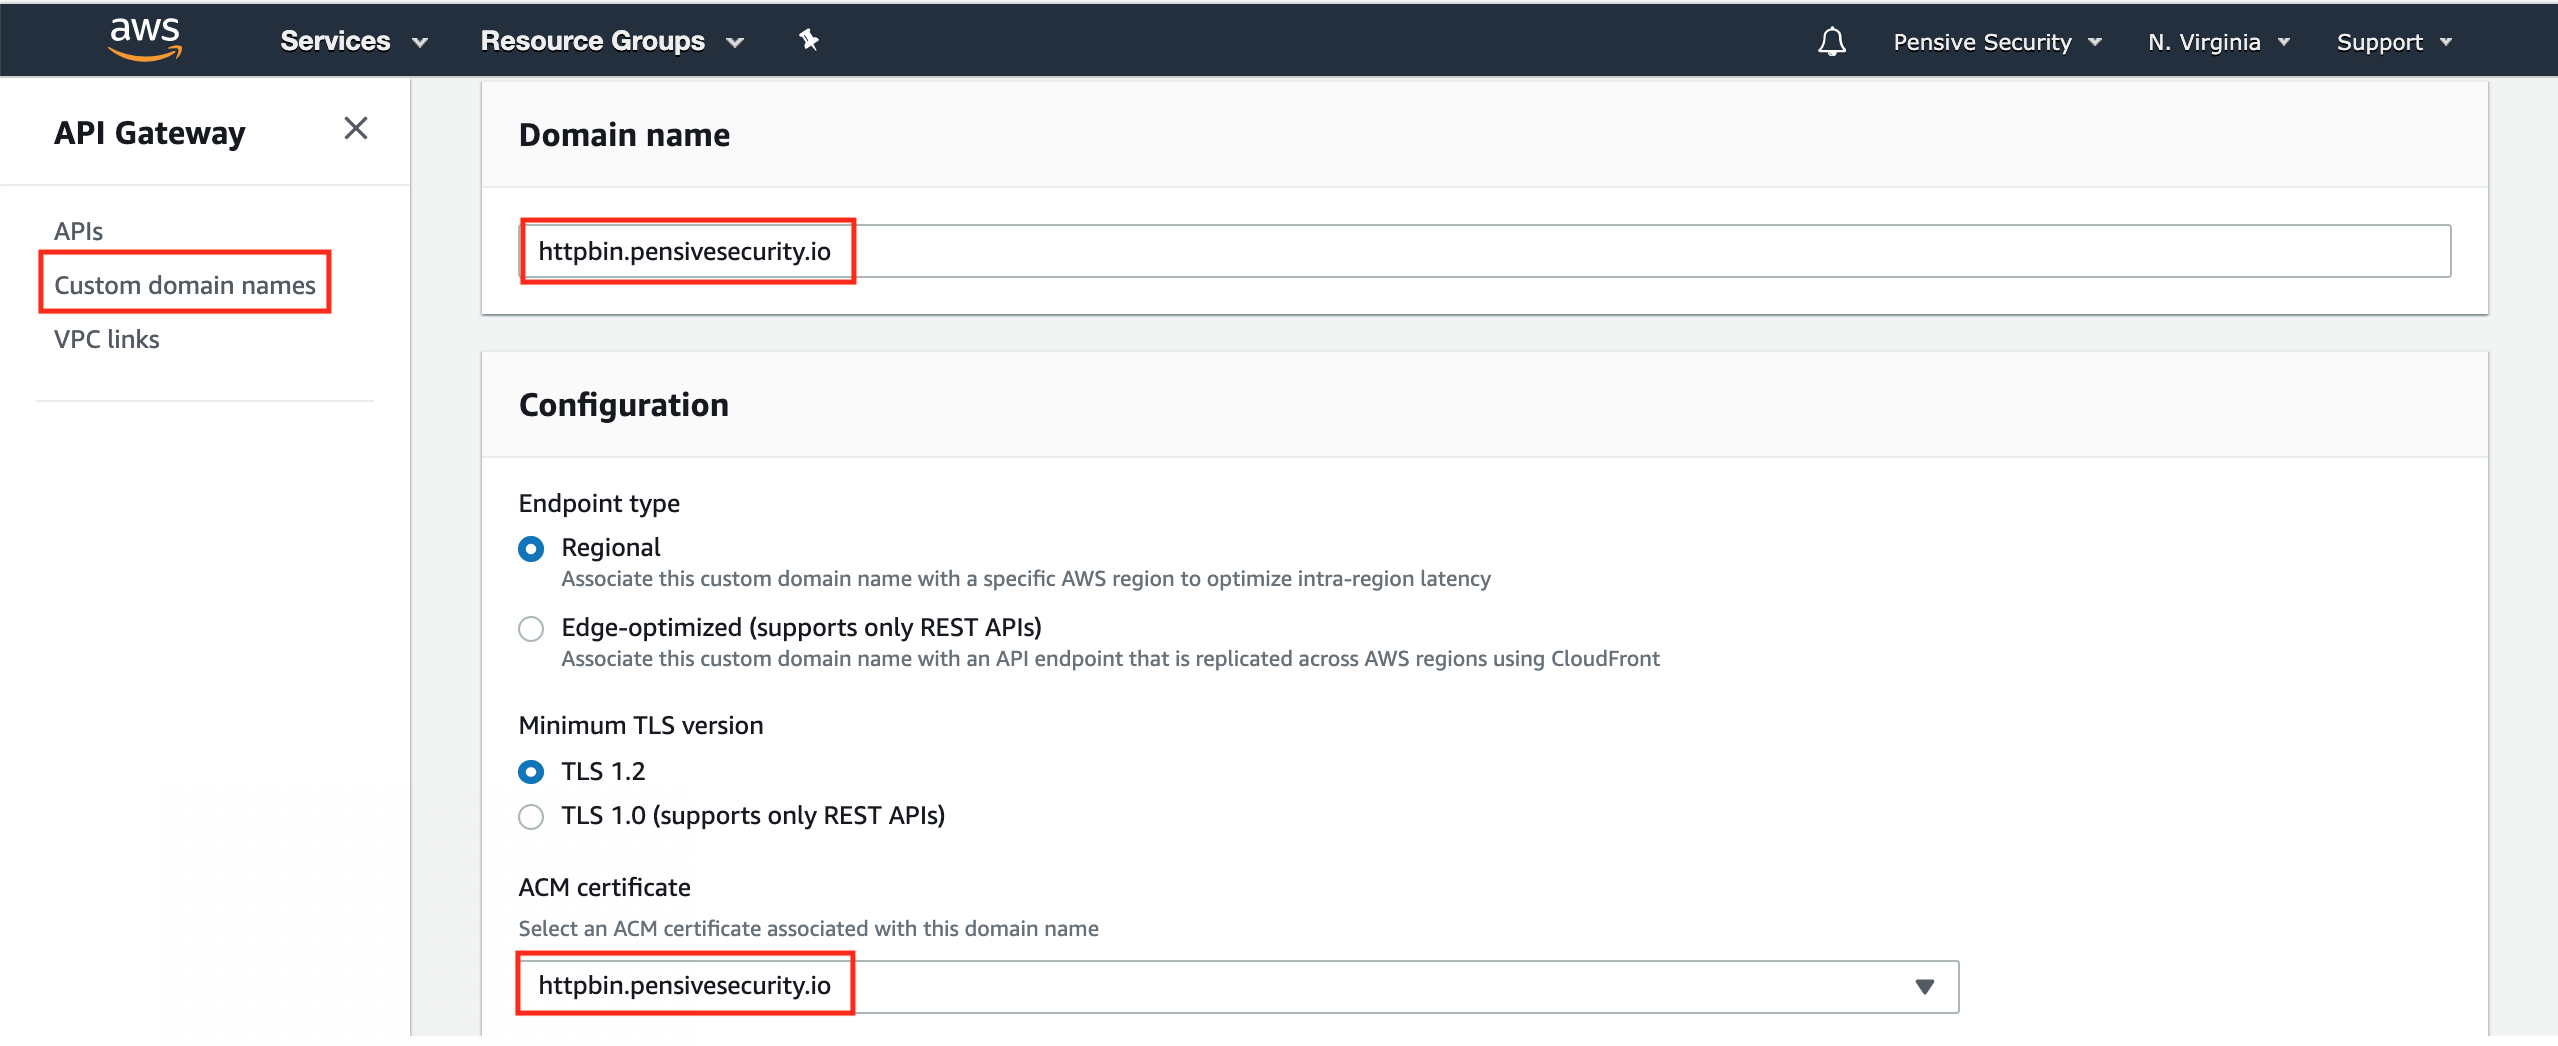
- Click “Create”
- Make a note of the API Gateway domain name listed for the subdomain we just created. (For us, it is
d-84fcc0kdvb.execute-api.us-east-1.amazonaws.com)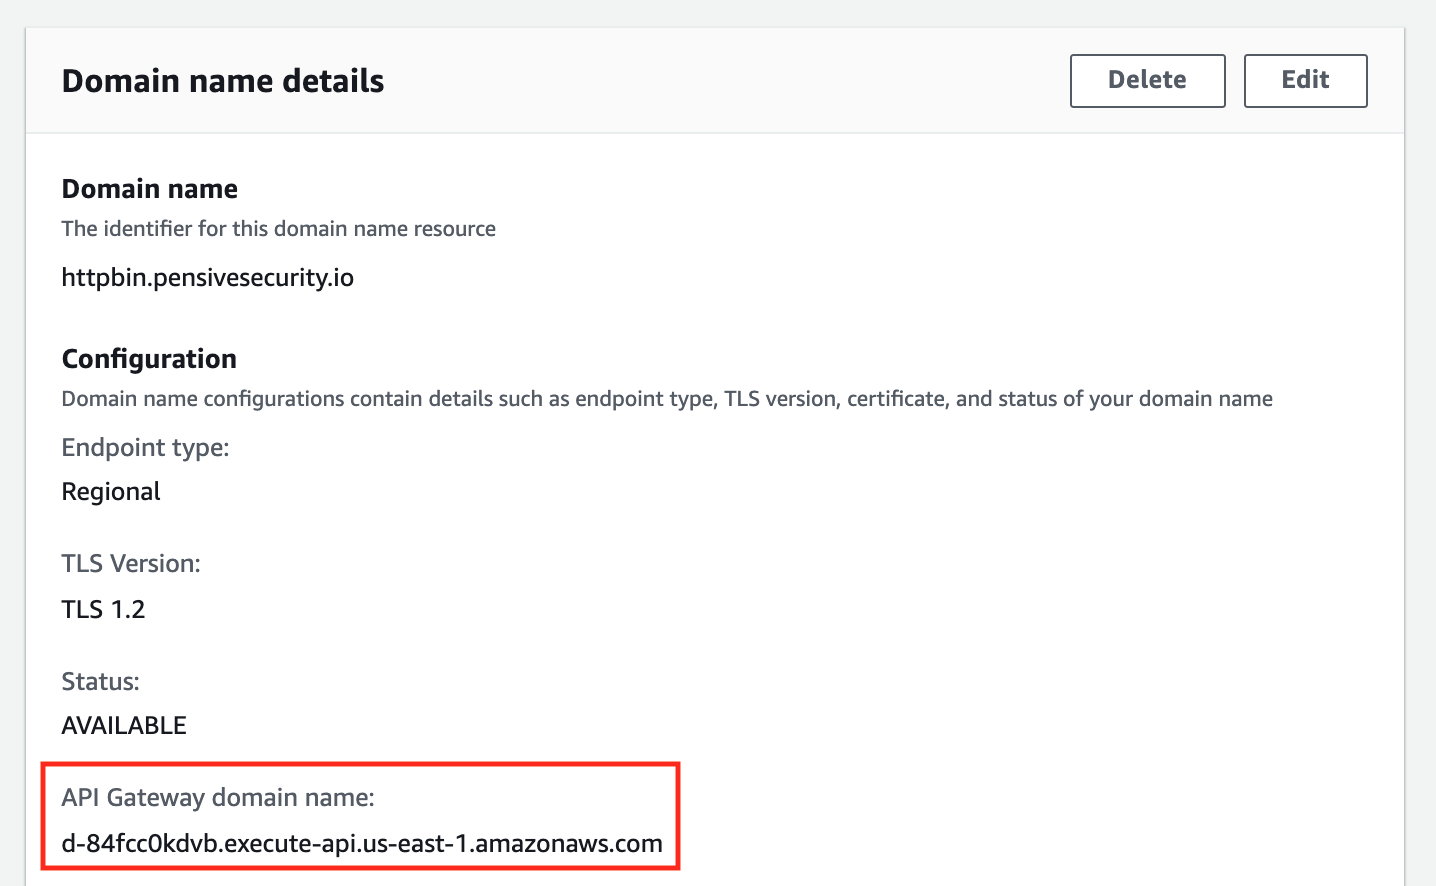
- Scroll down and click “Configure API mappings”
- Click “Add new mapping”
- Under API, select the entry matching the value you created earlier. For us, it is “fireprox_httpbin”. Under Stage, select “fireprox”. Leave “Path” empty
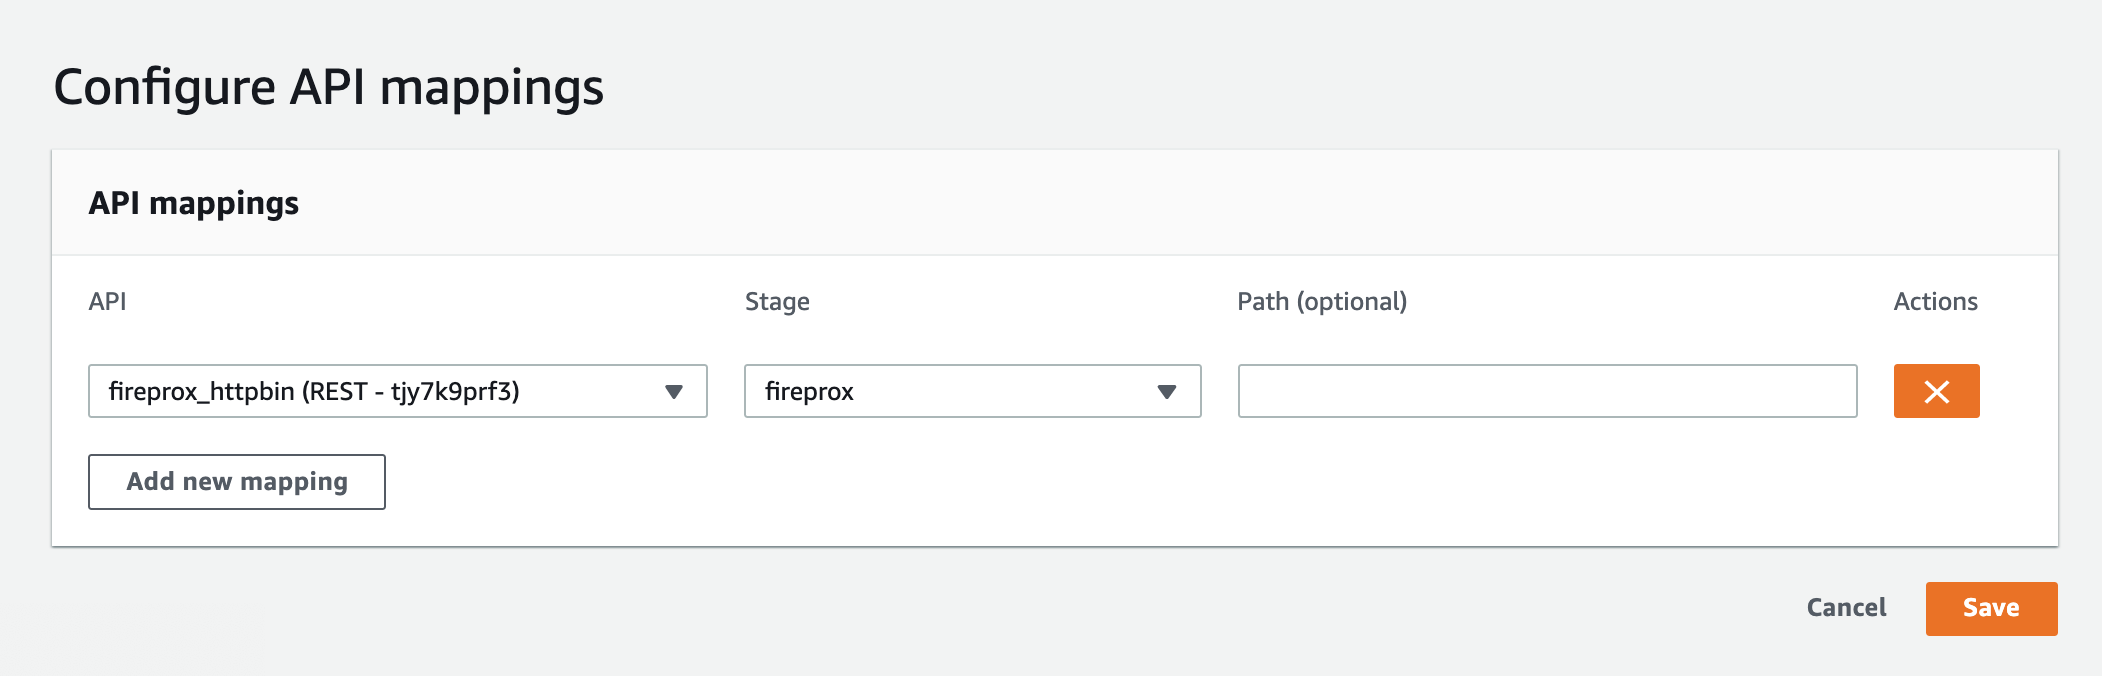
- Click “Save”
5. Create a DNS Record for Our Configuration
We are now ready to create a DNS record that points to the API Gateway domain name that we created.
- Navigate back to Route53 using the “Services” menu in the top left of the AWS Console
- Click on the hosted zone that is associated with the domain you created above. If it doesn’t exist, click “Create Hosted Zone” and create one, then navigate into it.
- Click “Create Record Set”
a. For “Name”, enter the subdomain you created earlier (for us it ishttpbin).
b. For “Type”, select “A - IPv4 address”.
c. For “Alias” select “Yes”.
d. For “Alias Target”, enter the API Gateway domain name we created previously (for us it isd-84fcc0kdvb.execute-api.us-east-1.amazonaws.com)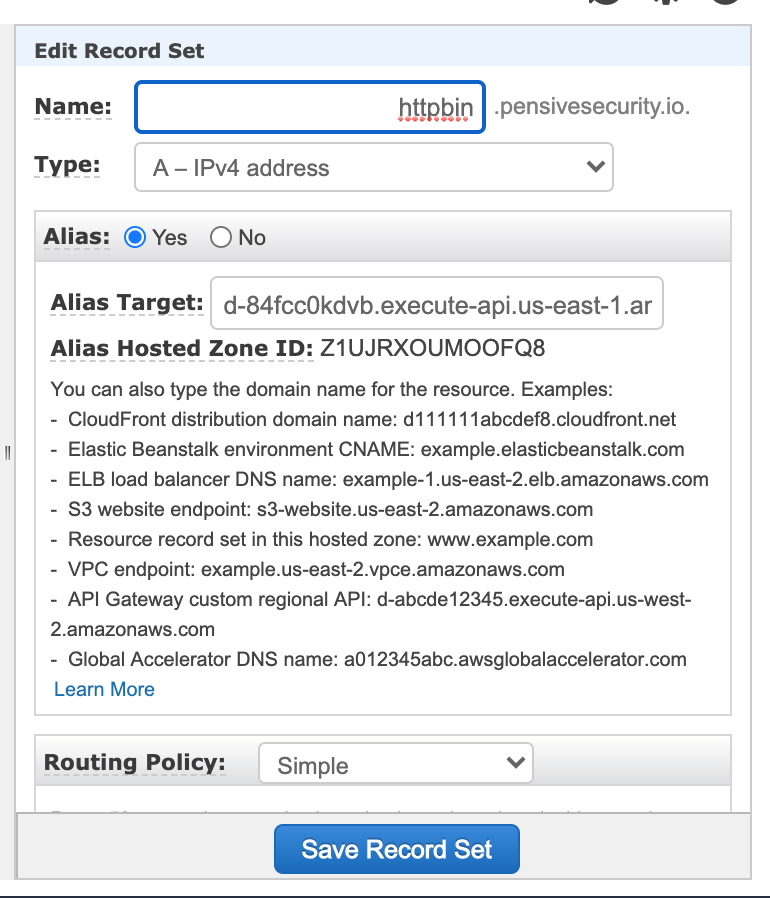
- Click “Create”
- Wait 20-30 minutes for the DNS settings to propagate. Once the settings have propagated, you can navigate to your subdomain in Firefox, and you should see your target site appear. Make sure you use HTTPS (for us, it is https://httpbin.pensivesecurity.io/).
Let’s Review
That was a lot of steps! Let’s take a short break and review what we’ve done.
Effectively, what we have accomplished is routing all requests to httpbin.pensivesecurity.io to our subdomain. In turn, these requests are directed to our API Gateway and, ultimately, to our target site. If we refer to our diagram again, here is what we have accomplished.

What this does is allow us to use API Gateway’s inherent IP rotation to make each request from a single IP to our own subdomain results in the target site seeing a new IP source from the API Gateway. This lets us interact with the target site with a new IP for every request we make. Pretty cool, huh?
6. Integrate with Burp Suite
Overview
It’s great that we have successfully set up IP rotation, and we can now send requests to https://httpbin.pensivesecurity.io/, which will be automatically proxied and forwarded to the target site. However, it would be even better to integrate it with our favorite web application testing tool, Burp Suite! Then we can use it for scanning and use Extender tools like Turbo Intruder.
To set this up, we will need to write a custom Burp Suite Extension that will automatically do the forwarding for us. I’ve already done most of the work for you, so don’t despair!
First, make sure you have Burp Suite installed (community edition is fine). Make sure you have it configured to work with Firefox or whichever browser you prefer. If you don’t know how to set this up, follow this guide: https://portswigger.net/burp/documentation/desktop/penetration-testing/configuring-your-browser.
Once you have Burp Suite set up, let’s set it up to work with our Fireprox configuration.
Custom Extension
First, we need to write our custom extension.
- Open up your favorite text editor and copy in the following code:
1
2
3
4
5
6
7
8
9
10
11
12
13
14
15
16
17
18
19
20
21
22
23
24
25
26
27
28
29
30
31
32
33
34
35
36
37
38
39
40
41
42
43
44
45
46
47
48
49
50
51
from burp import IBurpExtender
from burp import IHttpListener
import random
import socket
import struct
HOST_FROM = ""
HOST_TO = ""
class BurpExtender(IBurpExtender, IHttpListener):
#
# implement IBurpExtender
#
def registerExtenderCallbacks(self, callbacks):
# obtain an extension helpers object
self._helpers = callbacks.getHelpers()
# set our extension name
callbacks.setExtensionName("Traffic redirector")
# register ourselves as an HTTP listener
callbacks.registerHttpListener(self)
#
# implement IHttpListener
#
def processHttpMessage(self, toolFlag, messageIsRequest, messageInfo):
helpers = self._helpers
# only process requests
if not messageIsRequest:
return
# get the HTTP service for the request
httpService = messageInfo.getHttpService()
# if the host is HOST_FROM, change it to HOST_TO
if (HOST_FROM == httpService.getHost()):
message = helpers.bytesToString(messageInfo.getRequest())
message = message.replace("Host: " + HOST_FROM, "Host: " + HOST_TO)
message_array = message.split("\n")
random_ip = socket.inet_ntoa(struct.pack('>I', random.randint(1, 0xffffffff)))
message_array.insert(3, "X-My-X-Forwarded-For: " + random_ip)
message = "\n".join(message_array)
print(message)
message = helpers.stringToBytes(message)
messageInfo.setHttpService(self._helpers.buildHttpService(HOST_TO,httpService.getPort(),httpService.getProtocol()))
messageInfo.setRequest(message) - Notice the
HOST_FROMandHOST_TOvariables on lines 4-5.
a. ChangeHOST_FROMto be the target domain (for us it’shttpbin.org)
b. ChangeHOST_TOto be the subdomain you set up in Route53 (for us it’shttpbin.pensivesecurity.io) - Save this file as
traffic-redirector.pyin your working directory. - Start Burp Suite and create a temporary project with the default settings.
- Click on the “Extender” tab
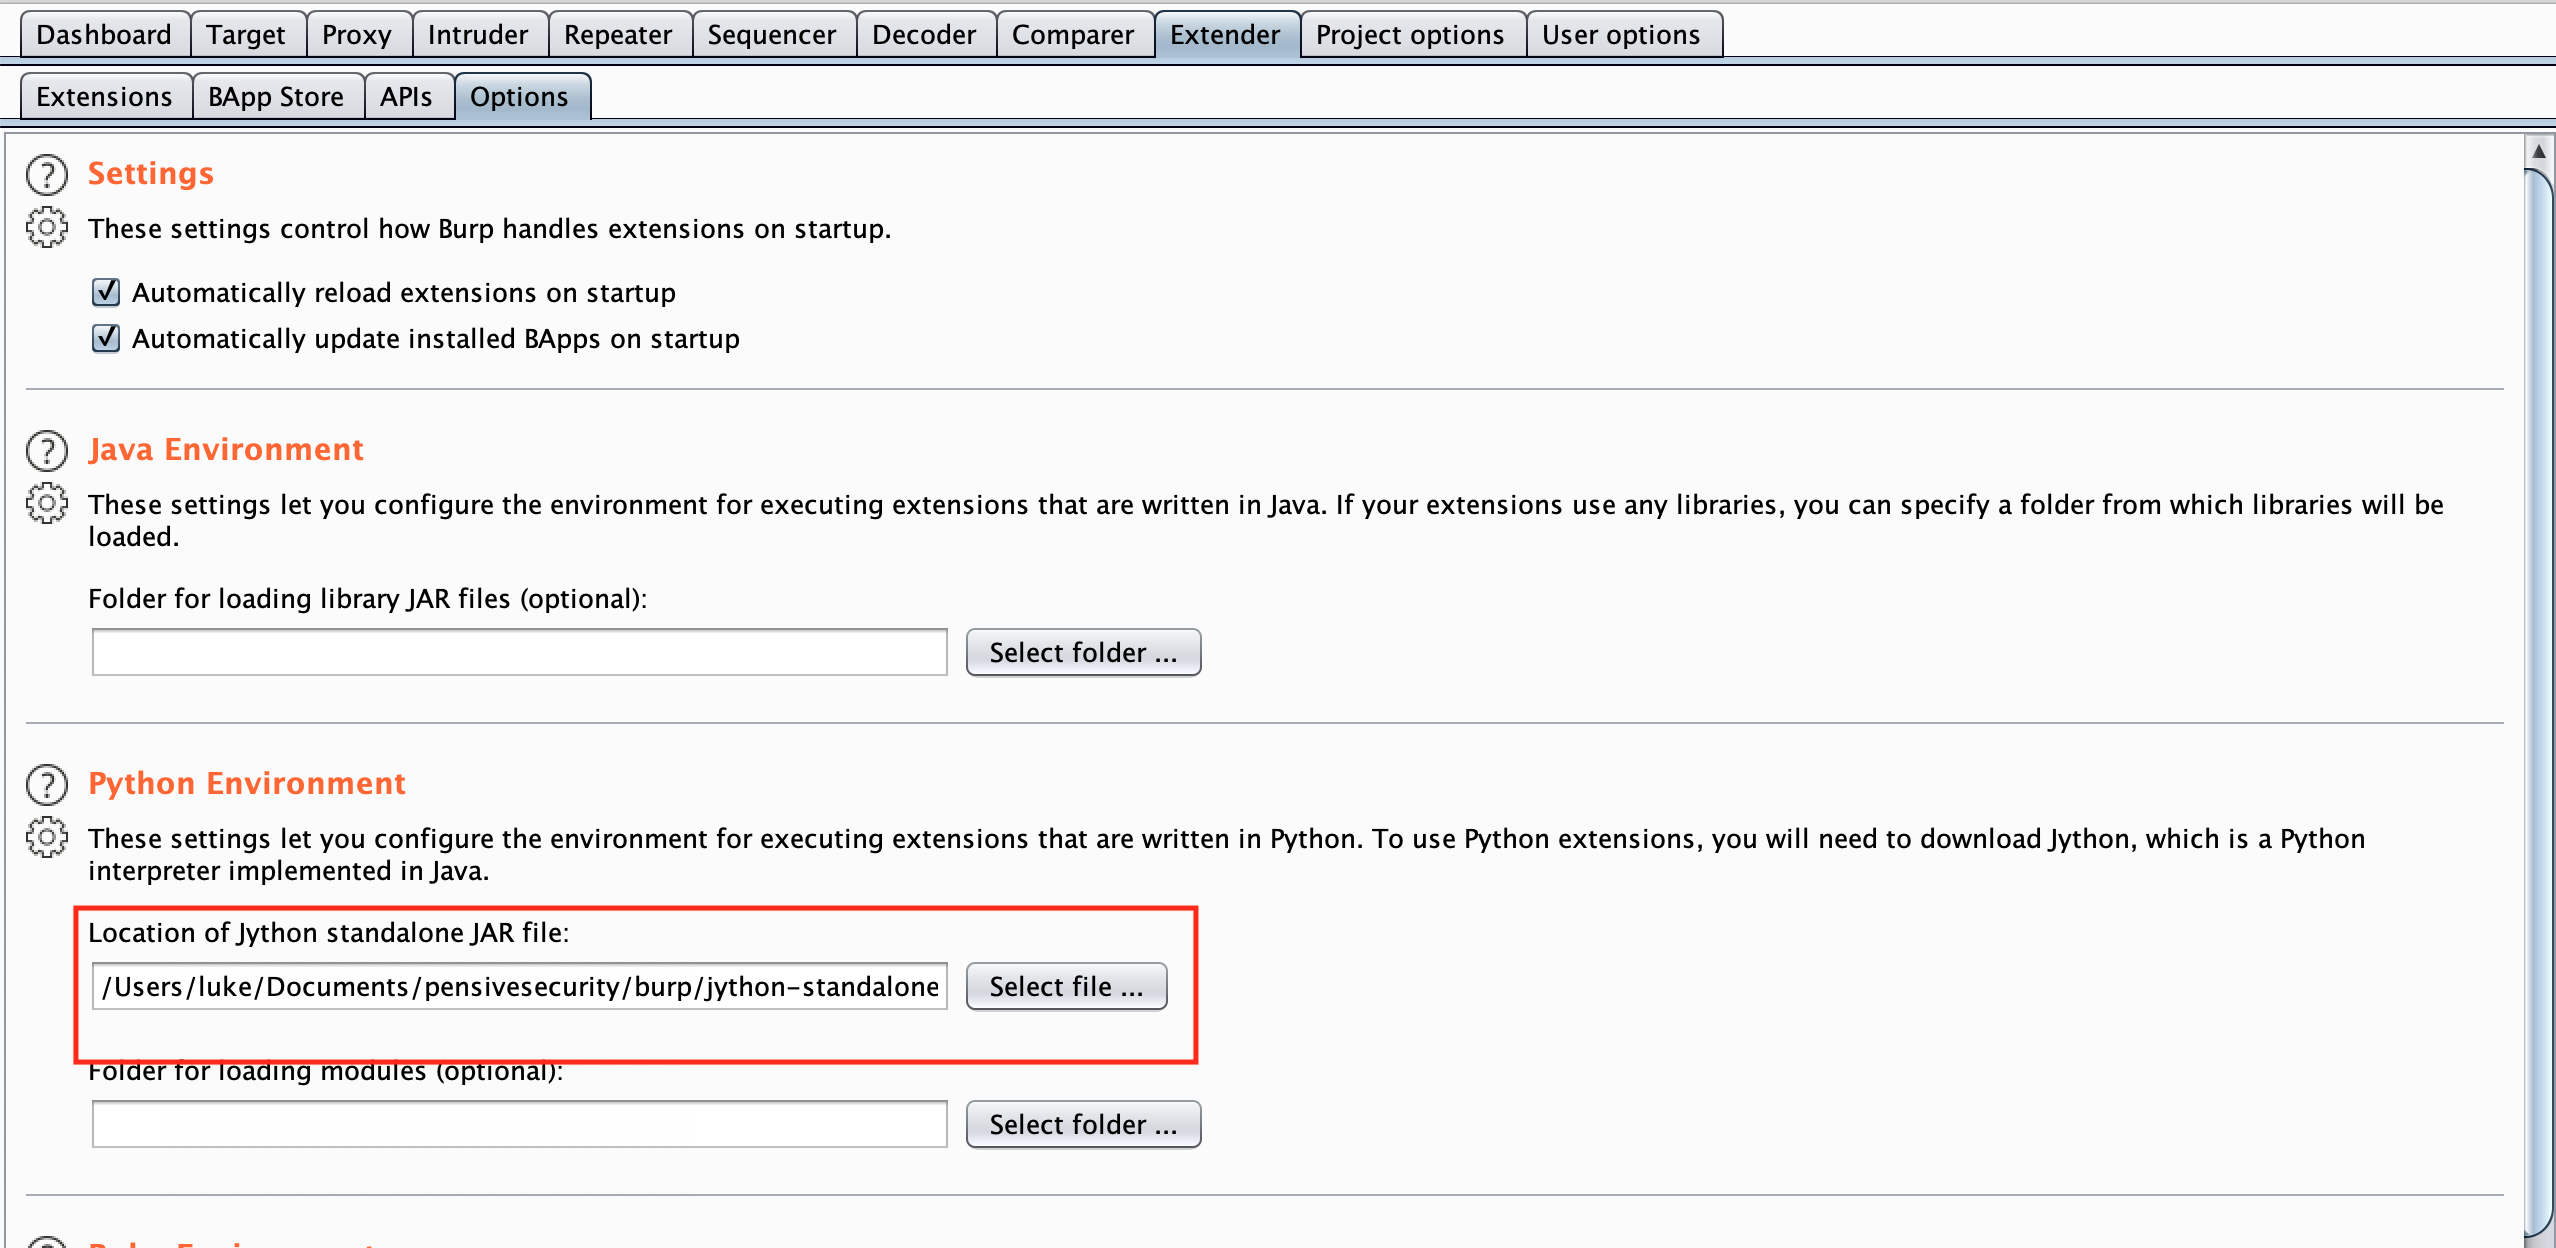
- If you don’t have Jython configured, download the newest Standalone Jar version from here: https://www.jython.org/jython-old-sites/downloads.html and then click “Options” and specify the full path of the location you saved the Standalone Jar to
- Click “Extensions” in the “Extender” tab
- Click “Add” under “Burp Extensions”
- Select “Extension type” as Python
- Click “Select file …” and choose the
traffic-redirector.pyfile you created earlier
- Click “Next”
- Verify that the message at the top says, “The extension loaded successfully”. If you get an error, make sure you have proper Python syntax in your
traffic-redirector.pyfile and then attempt to “Remove” and then “Add” again (or simply uncheck and recheck the Extension’s checkbox)
7. Testing it Out
We have all of the pieces in place; let’s test out our configuration!
- In the browser, you have connected to Burp Suite (we are using Firefox) navigate to your target website (for us, it’s https://httpbin.org/ip). Make sure you navigate to the target site https://httpbin.org/ip and NOT to your subdomain.
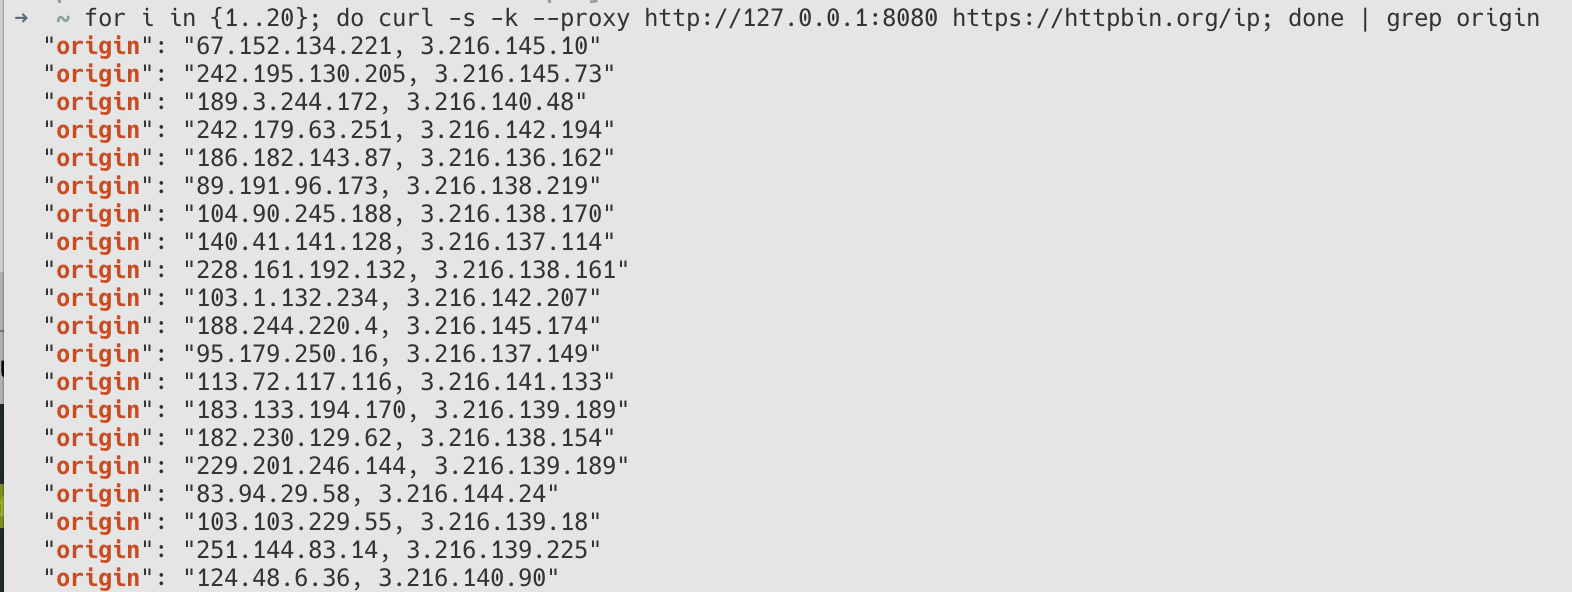
- Observe that each time you refresh the page, your IP address has changed!
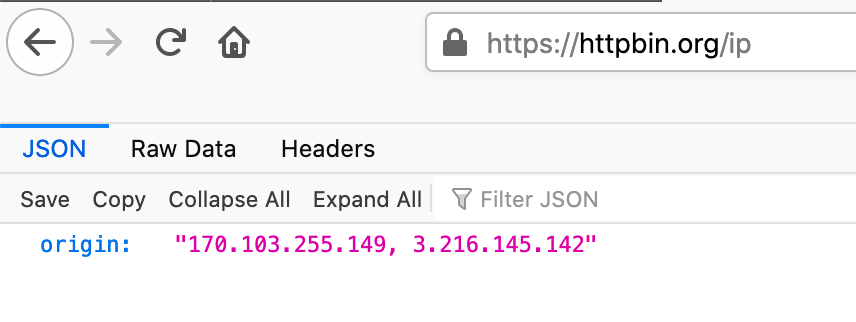
- You now have everything set up correctly! If you want to try a few requests in a row and compare how your IP changes, run this script:
1
for i in {1..20}; do curl -s -k --proxy http://127.0.0.1:8080 https://httpbin.org/ip; done | grep origin
- You can now use your browser and any Burp Suite tools against your target domain, and your IP address will be automatically rotated in the background.